Showing posts with label Recipes. Show all posts

Wednesday, 7 August 2024

Pumpkin Bread ( and it's oh, so yummy )

 Recently I was on the hunt for new pumpkin recipes to make the most of the rogue pumpkin we had growing in our garden.

I already bake pumpkin scones,  make pumpkin soup,  veggie soup and of course roasted pumpkin.  I had in my head that I wanted to make a bread or loaf type cake with pumpkin being the main ingredient.  

So after doing a Google search I came up with this recipe and the reviews were fantastic.  Of course I've tweaked the recipe like I usually do to suit our tastes.  I've tried to estimate how much cinnamon,  nutmeg,  ginger and allspice I used but in reality I gave each bottle a really good shake.  I wanted lots of flavour.

1 cup of cooked,  drained Pumpkin.  I used Jap / Kent

100g of salted Butter

1 1/2 cups of Brown Sugar

2 Eggs at room temperature

2 cups of Self Raising Flour

1/2 teaspoon of Bi Carb of Soda

2 teaspoons of Cinnamon

2 teaspoons of Nutmeg

1 teaspoon of dried Ginger

1 1/2 teaspoons of Allspice


Grease and flour an oblong loaf pan.  Line the base with baking paper

Also have a 6 hole muffin tin ready,  lined with patty cases.

Cream the butter,  sugar and eggs together until smooth.

In a separate bowl mix the flour,  bi carb,  cinnamon,  nutmeg,  ginger and allspice until well combined.

Add the flour / spice mix to the wet ingredients and combine with a wooden spoon.  The mixture will be quite thick.

Spoon the batter into the lined loaf tin until it's 2 / 3 full.

Spoon the remaining batter into the muffin tin.

Bake the loaf at 160 degrees Celsius ( 320 Fahrenheit ) for 50 - 55 minutes until a skewer comes out clean.

Bake the muffins at 160 degrees Celsius for approx 25 minutes.

Turn onto a cake rack to cool.

NOTES - 

*  The loaf can be sliced and toasted in an air fryer for 5 minutes until golden.  Serve with butter.

*  I like the muffins heated in the microwave,  cut in half and served with butter.

*  The loaf and muffins can be frozen

*  I think the brown sugar content can be reduced to 1 1/3  cups.  I'll let you know the next time I make it.

*  I used homemade brown sugar in this recipe.

Pumpkin Loaf


Pumpkin Muffins

Yummy and tasty


Have you made a pumpkin loaf or bread before ?

If you use this recipe,  please let me know what you think.


Wednesday, 5 June 2024

Crunchy Muesli Bars

 Muesli bars were only one of the few convenience foods still on my shopping list.  That was until 2 months ago.  Have you seen the price of muesli bars lately ?  Oh  my goodness  !!!!  Hardly anything is under $5 a box of 5 - 6 bars and most are drizzled with unnecessary chocolate or a yoghurt type topping.  It's rare to find a half price sale too.

So this led me on a hunt to find a delicious muesli bar recipe that I could afford to make.  I wanted something crunchy,  or at least slightly crunchy,  it had to include pantry staples and needed to have ingredients I could interchange  according to our tastes and budget.

I found a recipe through a Google search,  changed it a few times until I came up with something both Darren and I look forward to eating when we are at work.  The bars are not super sweet but we found they were sweet enough.  Each bar weighs about 15g more than store bought ones so this is a bonus.  The final recipe doesn't really resemble the original recipe so I'll claim it as my own.

1 cup of Rolled Oats

1 Wheat Bix ( crushed )

1/4 cup of corn flakes ( crushed )

1/2 cup of Dried Fruit of choice.  I used sultanas,  dried apricots ( diced ) and cranberries

3/4 cup of Chopped Nuts.  I used cashews and walnuts

1/3 cup of  Honey

1/4 cup of Peanut Butter.  I used crunchy but any will do

3/4 teaspoon of Cinnamon

1/4 teaspoon of Salt

1/4 cup of Choc Bits.  I used small generic ones.


Spread the oats and nuts on a baking tray and toast in the oven for 10 minutes at 160 degrees Celsius.

Pour the honey into a measuring jug and microwave for about 20  - 30 seconds until it is runny.  

Add the peanut butter to the honey and stir until well combined.

Once the oats and nuts are toasted and cooled,  place in a large mixing bowl with the wheat bix and corn flakes.

Add the dried fruits,  cinnamon,  salt and choc bits.  Mix well.

Add the combined honey and peanut butter to all the dry ingredients and mix well until everything is coated.

Place the mixture in a lined oblong oven slice tray.  Press down with a potato masher or wet fingers until it is even and firm.

Refrigerate for 1 hour until firm.

Remove the slice from the oven tray and cut into 10 bars with a sharp knife.  Neaten and firm the edges of the bars if needed.

Place the bars on a lined oven tray ( larger than the slice tray ) and space them apart.

Bake at 160 degrees Celsius for 20 - 25 minutes.

Cool on the tray for 5 minutes before moving them to a cooling rack.  

Store in an airtight container for up to 3 weeks. 

NOTES -

*  Wheat bix,  rice bubbles,  corn flakes or similar cereals could be used as long as the rolled oats and cereals total 1 1/2 cups worth.

*  Use dried fruit of your choice providing it's fairly small.

*  The choc bits are an optional extra.

*  Use nuts of your choice.  

*  20 minutes of baking will give slightly crunchy bars with a bit of give.  25 minutes will make them completely crunchy.

Baked muesli bars

Ready for baking.

Have you tried making your own muesli bars ?

What flavour combination would you add to your muesli bars ?


Wednesday, 12 April 2023

White Chocolate, Apple And Custard Muffins


This muffin recipe is a great one if you have some apples that need using up.

2 cups of Self Raising flour
1 cup of plain flour
1 teaspoon nutmeg

1 teaspoon of cinnamon
1/2 cup of brown sugar
1/4 cup of custard powder
100g melted butter
1 cup of milk

¼ cup of canola oil
1 egg beaten
2 large apples - grated or finely diced
white choc bits - as many as you want

Mix all dry ingredients together
mix all wet ingredients into dry .
Add white choc bits and apple.
Stir until just combined

Bake at 180c for approx 20 mins
Muffins freeze well.


I'm sorry but I don't have a photo of the muffins once baked.  It's been a few years since I've made them and at the time didn't think to take a photo.  Still,  they were enjoyed by my family.


Wednesday, 3 August 2022

3 Recipes To Stretch Beef Mince A LONG Way.

 Pretty much all meat prices have skyrocketed lately almost making it a luxury item on the menu.  Beef mince has increased from $5 a kilo in 2013 to $13 a kilo in 2022.  Considering beef mince is usually a family staple,  that increase really hits the family food budget hard.

We still eat beef mince but some recipes are now off our menu or rarely eaten.  I do stretch beef mince with TVP ( textured vegetable protein ) to help keep costs down.   We don't notice the ever so slightly different texture and color of TVP but I think the trick is to choose your recipes wisely and add lots of veggies.

Here are the links to 3 main meal recipes that I've successfully used TVP and beef mince in and still feel like we are getting plenty of meat.  Maybe you can try them on your family.  Just don't tell them about the TVP until they have finished eating.

As per usual,  use whatever veggies you have on hand or can afford.


                                                                                    Chop Suey


How do you stretch beef mince in your recipes ?

What is your best beef mince recipe ?


Wednesday, 20 July 2022

Beef Mince Pasta Bake

 Here is a very tasty,  simple and most importantly CHEAP main meal recipe that is a family favourite.   Any veggies you have on hand can be used.  We always use what's in season or what needs using up in the fridge. 

This pasta bake also transports well.  Assemble in the casserole dish and bake at your destination or cook before travelling and just reheat.


250 g of beef mince
300g of cooked spiral pasta ( any shape will do, we like spiral )
1 tin of condensed tomato soup 
1/2 tin of water
2 – 3 cups of vegetables -  broccoli, cauliflower, corn, beans, mushrooms, carrots,  celery  etc
seasonings - salt, pepper, garlic, onion, chives or parsley. I use dried herbs
grated cheese

While pasta and beef mince is cooking, cut up vegies into small pieces and cook in microwave for 6 mins.
In a very large bowl, mix soup, water and seasonings.
Add the cooked  pasta, beef mince and vegies to the soup and stir well
Pour into a large oblong casserole dish and top with grated cheese.
Cook in oven at 180c for 40 mins until cheese is starting to brown

Serve with mash or toast. Serves 4 - 6 people


Wednesday, 9 March 2022

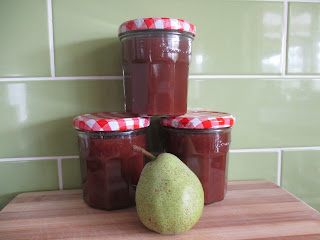
Apple Pear Butter

 Last year was our first year of a fairly bountiful harvest of pears from our miniature tree.  The fruit was hard and not too flavoursome for fresh eating so I had to find a way to use it up.  After searching YouTube ( as you do ),  I found general instructions for pear butter.

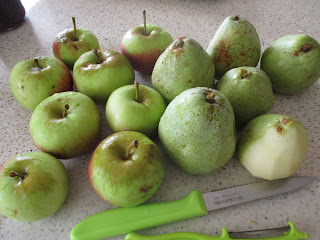
This year we had the pears again but I was also given small green apples from a friend.  I decided to combine the two fruits and made this recipe up as I went along.

The result was a fruity yet slightly tangy spread.   It makes a delicious spread on toast,  crumpets and muffins.   Maybe you will find some other uses for it too.  Perhaps spread it on  dry crackers with a little Camembert cheese.


8 large Pears or 1 - 1.5 kilos

4 medium Green Apples or 0.5 - 1 kilos

1/2 cup of tap Water

Juice of 2 Lemons

1/2 cup of Brown Sugar

2 teaspoons of dried Cinnamon

1 teaspoon of dried Nutmeg 


Turn your slow cooker on low ( if it runs very hot ) or high if it's a very slow cooker 

Peel,  core and slice the pears and apples.

Place in the slow cooker.

Add all the other ingredients to the slow cooker.

Cook for 8 - 10 hours or overnight

Lift the lid and give it a good stir.

Use a stick blender to blitz the fruit until it's smooth.

Leave the slow cooker lid off and continue to cook for another 4 hours or so until some of the liquid has reduced.

Spoon into hot ,  sterilised jars and seal.

Store in the fridge for 2 - 3 weeks or freeze for longer storage.


The finished product

Getting the fruit ready

Cooking in the slow cooker


Wednesday, 23 September 2020

How To Make Butter.

 Making butter is a very simple task to do.  I remember making butter in primary school by passing around a glass jar with cream and a marble inside.  Every child got a turn in shaking the jar to turn it's contents into butter.  We then spread a little butter on a dry biscuit and enjoyed our hard work.

Fast forward 40 + years and I'm now making butter once or twice a week thanks to an abundance of free cream I had access to recently. Due to it's very short use by date I've had to freeze the cream to prevent wastage.

 If you don't have access to free cream then you'll need to buy thickened ( pouring ) cream at a heavily reduced price to make it worth your while - money wise. During the butter making process you'll loose about 60% of the cream weight when it separates into buttermilk and butter.

I've been using 3 x 300 ml bottles of cream totaling 900 mls. Out of the 900 mls  of cream I get 365 grams of butter which is 40% of the total weight.  The rest of the weight is buttermilk.

Here's how I make butter -

* Pour 3 x 300 ml bottles of cream into a stand mixer bowl.  Scrape the bottles clean. If you don't have a stand mixer then use a hand held electric beater and a large bowl.  

*  Add 5 level teaspoons of salt to the cream for flavour.  This is optional and you can add or delete to taste.

*  Beat the cream until it turns yellow and separates into small clumps of butter.  The texture looks like scrambled eggs.  You'll notice liquid down the bottom of the bowl.  This is buttermilk and can be used in baking and cooking. This process can take 10 - 15 minutes depending on your beaters and longer if the cream was frozen ( and defrosted ).

*  Place a clean chux cloth,  cheesecloth or muslin over a large bowl and spoon in 1/3 of the butter .  

*  Gather up all sides of the material,  twist then squeeze out all the remaining liquid. 

*  Place the butter in a clean container.

*  Repeat the process until all the butter has been squeezed and drained.

*  Store in the fridge until needed.  I keep two containers in the fridge as a stockpile and one in the pantry for use.

*  Pour the buttermilk into a jug,  cover and store in the fridge until needed.  I've use it to make mashed potato.  Others use it in cake and muffin baking.

The finished product

When the cream separates into butter and buttermilk

Draining the butter

Unwrapping the cloth

Have you made butter before ?

Wednesday, 26 February 2020

Rice Salad

Last year it was our turn to host Christmas lunch for my extended family.  With Australia having warm Christmas Days,  I try to keep this in mind when organising the menu.  I wanted to try a rice salad for a change but didn't have a recipe.  After doing a Google search and blending a couple of recipes,  I came up with the following.  It was a hit with the family and a few days later I made it again when we had a heat wave.

1 1/2 cups of uncooked rice
!/2 red Capsicum finely diced
1 medium Carrot, grated
1 small Cucumber finely diced
1 Celery stalk finely diced
1/2 cup of Raisins, chopped
1/4 cup of crushed Cashews - optional

DRESSING -

1/3 cup of Olive Oil
2 Tb Soy Sauce
1 Tb Lemon Juice
2 Tb Honey
1 Tb Dijon Mustard
1 Tsp dried Ginger

Wash and drain the rice.
Cook as per packet instructions
Once rice has cooled,  place in an extra large bowl.
Add capsicum,  carrot,  cucumber, celery, and raisins to the rice and mix well.
In a small jar add all the dressing ingredients and place the lid on.
Shake well and add to the rice mixture. Spoon the dressing through until well combined
Serve cold.  I serve the cashews on the side for people to help themselves

Serves 6 - 8 as a side dish.


Wednesday, 5 February 2020

Zucchini Fritters

Darren came across a similar recipe to this on Facebook a couple of weeks ago.  I'm always looking for something different to make that has normal ingredients and goes great with salads and meats.  Darren was thrilled to have another excuse to fire up the bbq.
The recipe below is one I made up from the original recipe using what I already had on hand..

1 large Zucchini
1 small Carrot
2 medium Silverbeet leaves, finely chopped
1/2 cup of Plain Flour
2 Eggs
1/2 cup of grated Cheese
Zest of 1 Lemon
Season to taste with dried onion flakes,  parsley,  garlic powder and salt and pepper.
Oil for frying

Grate the zucchini with the large holes on your grater.
Use the fine grating side to grate the carrot.
Squeeze out all the liquid from the zucchini and carrot.
Add all other ingredients and mix well.
Heat a small amount of oil in a large fry pan or on the bbq.
Drop a soup spoonful of mixture into the oil and spread  slightly.
Cook for 2 - 3 minutes on each side on a medium heat
Serve with sour cream,  tomato sauce or a dip of your choice

NOTES -

*  I didn't have lemon zest in the freezer so I just used lemon juice.
*  If you don't have silverbeet on hand,  spinach or any green herbs will work too.
*  Darren used a bbq mat on his bbq to cook the fritters.  This really helped with the clean up and still gave the fritters lots of color.
*  Fritters can be frozen but need go between or squares of cereal packet in between each fritter to help separate.
*  If you have an air fryer,  fritters can be reheated in about 3 minutes.

Makes about 15 fritters.


Wednesday, 1 May 2019

Chocolate Ring Cake

This chocolate cake recipe has been a favourite on our home for over 15 years.  Iced or un iced,  it doesn't really matter.  It seems to disappear before my eyes.  Great for lunchboxes,  gatherings or to freeze for future occasions.

90 g of softened butter
2 eggs
dash of vanilla extract
2/3 cup of white sugar
1 1/4 cup of Self Raising flour
3 tablespoons of cocoa powder
3/4 cup of milk
1/4 cup of canola oil

Cream the butter,  sugar and vanilla until light. 
Add the eggs and beat in well. 
Add all the other ingredients and beat until light and fluffy.  Add extra milk if mixture looks a little stiff.
Pour into a greased and floured ring tin
Bake at 180 degrees Celsius for 40 - 50 minutes until a skewer comes out clean
When the cake is cold,  invert onto a cooling rack.
Ice with chocolate icing and sprinkles ( or coconut ).

 This recipe is easy to double. 


Wednesday, 3 April 2019

DIY Garlic Bread.

I'm not a fan of store bought garlic breads.  They seem to be very heavy and doughy.  I personally haven't bought a garlic bread for the last two decades but they have been served up at gatherings.  I just couldn't see the point and my budget never really allowed for the extra expense.

Garlic and herb breads can be made with bread sticks,  bread rolls or even a loaf of bread.  Take your pick.  Here's how I make mine -

*  Bread stick
*  Butter
*  Dried mixed herbs
*  Garlic powder or dried garlic granules
*  Salt ( if needed )

Cut the bread stick ( or roll ) into slices.
Lay the pieces flat and spread butter on each piece.
Sprinkle garlic,  mixed herbs and salt on each piece of bread.
Stack the bread pieces together and turn the end piece back to front so the buttered side is facing inwards.
Wrap the bread stick in foil and freeze until needed.

To heat up,  turn the oven on to 180 degrees Celsius and place the bread stick on an oven tray then place in the oven.
Heat for 15 minutes then open the foil up slightly and heat for a further 5 - 7 minutes.  Serve.

NOTES -

*  I portion the bread stick into 6 - 7 pieces which is enough for the three of us.  This reduces or eliminates wastage.

*  Garlic bread can be heated under the grill in the oven without the foil.  This method is quicker but you need to keep an eye on it as it can burn quickly.


Wednesday, 13 March 2019

Massaman Beef Curry

Last year I was given a packet of Massaman Beef Curry recipe mix to use in the slow cooker.  Usually I'm sceptical that a packet mix will taste nice but was pleasantly surprised.

Of course I've adjusted the recipe to suit our tastes and budget.  Here's my version of a super yummy and mouth watering curry -

400 - 500 grams of diced beef.  I've used Oyster Blade or Casserole Beef
1  400ml tin of Coconut Cream or milk
1 packet of McCormick's Massaman Beef Curry  ( Slow Cookers ).
5 medium potatoes cut into large cubes
1 1/2 cups of beans
2 medium carrots peeled and sliced
1 tin of boiling water

Turn the slow cooker on high and spray with olive oil or canola oil

Brown the diced beef in a fry pan then add to the slow cooker

Add the diced potato to the slow cooker next then add the other vegetables

In a medium bowl mix together 1 tin of coconut cream and 2/3 of the packet of Massaman Beef curry mix and 1 tin of boiling water.  A whisk is best used to combine these ingredients.

Pour the liquid into the slow cooker making sure there is enough liquid to almost cover everything.  Add a little more boiling water if needed.

Cook on high for 8 - 10 hours until the potato is soft.

Serve with rice.

Serves 6 - 7

NOTES -

*  Any vegetables can be added or substituted in the slow cooker although I think the potato is a must have.

*  I use the cheapest coconut cream available or you can use coconut milk.

*  I only use 2/3 of the packet because we found the recipe mix to be very strong in flavour and heat.   Keep the opened packet in a sealed container or use a clip to seal it.

*  Leftovers are portioned into takeaway food containers with a serve of rice to make it a complete meal.

*  Can be frozen for 6 + months.  Defrost in the fridge then reheat leftovers in the microwave.  Add a little water if needed during the reheat process.

*  Cut the beef into small cube so that it stretches further. .

*  I paid $1.50 for the packet mix.  I'm sure it will be much cheaper in Winter.


 Sorry,  due to the heat,  I only took a photo of the leftovers the next morning.


This is the packet I used.

Wednesday, 10 October 2018

3 Easy Chicken Marinades / Sauces

Once there was a time when all our chicken dishes were covered in a sauce that came from a jar.  I thought it was yummy.  Darren and the girls loved it ,  but we didn't know any better.  Then I needed to slash the grocery budget to free up some extra money.  Mr Google was helpful for ideas on how to make my own marinades as well as my own common sense.

I don't know how to make lemon chicken the conventional way.  Infact,  I've never looked for the recipe.  I just sort of made these recipes up in my head and tried them out on my family.  The feedback was positive and now the following recipes are firm favourites in our home.

The following recipes I've used on chicken pieces like drumsticks.  There's no need to measure anything.  Just a good squirt of this and that and adjust to your own personal taste.

Honey / soy - In a small bowl add a good squirt of honey and microwave for 20 seconds until runny. Then add a slightly smaller squirt of soy sauce. Mix together and brush over chicken. Season with garlic, pepper, parsley and onion flakes

Lemon chicken - squeeze 1 lemon over the chicken pieces. Season with salt, pepper, garlic, onion flakes and chives. Slice another lemon and place over each chicken piece.

Saucy chicken - use equal parts tomato and bbq sauce. Mix together with 1 - 2 teaspoons of mustard powder. Brush over chicken and season with salt and pepper.

Generally chicken pieces need to be cooked for 40 minutes at 180 degrees Celsius.  To intensify the flavour,  baste the chicken half way through the cooking time with juices from the bottom of the pan.
Honey Soy Chicken Drumsticks


Wednesday, 1 August 2018

Bringing Afternoon Tea

When you are asked to bring afternoon tea ,  what do you do ? Do you panic and race up to the shops to grab an assortment of dips and biscuits. Do you fork out $15 - $20 for a few bits and pieces. How about those supermarket mud cakes at $6 each ?

A couple of years ago, my family went to visit some friends ( for lunch ) we hadn't seen for about 12 years. My DH volunteered for me to bring something for afternoon tea. As a young mum or newly wed I would have panicked ( slightly ) about what to bring and the time needed to prepare suitable food. I would have panicked more about the financial strain on our budget. Yes, it would have been a strain back then. Things are different now.

So the day before the visit I pulled out two logs of biscuit / cookie dough from the freezer. While I had bread baking in the oven, I sliced the dough and placed it on the baking trays and flattened the dough slightly. This makes the biscuits look more professional. As soon as the bread came out of the oven, I put the biscuits in. Easy as.

Then as the biscuits were baking, I made a lemon slice. I already had the biscuits for the slice crumbed and in a snap lock bag in the pantry ready to go. It only took about five minutes to make the slice. Later on I iced it and cut it up.

When I put three containers on my friend's kitchen bench that Sunday, she was pleased to hear that it was all home baking. Both her and her husband gratefully received the goodies and we all enjoyed eating them. When our visit was up, there was still some baking left. I said they could keep it and let them know that it had to be eaten by Friday ( for freshness ). With big grins on their faces, they informed me it wouldn't last past Tuesday, with the thought it might be eaten with their tea that night

WHAT A GREAT COMPLIMENT !!! No one ever raves about a supermarket mud cake.

The best thing was, it only cost me about $3.50 to fill two large dinner plates of delicious food and about fifteen minutes of my time. HOW GOOD IS THAT ? ! ? ! 


With a little preparation ahead of time,  supplying a plate of yummies can be a breeze.


How do you provide a plate of afternoon tea when asked ?

Wednesday, 25 July 2018

Golden Syrup Dumplings

I just love a baked dessert in Winter. It ticks all the boxes doesn't it ?  Golden syrup dumplings are  warm and hearty,  full of flavour and very easy on the grocery budget.  I'm not sure where this recipe originates from but my Mum made this for the family when I was growing up.  She wrote this recipe out for me as a newly wed and it has become a Winter favourite in my home too.

SYRUP

1 1/2 cups of water
1/2 cup of sugar
1 tablespoon of butter
1 tablespoon of Golden Syrup

DUMPLINGS

1 cup of Self Raising flour
1 tablespoon of butter
1 egg
1/3 cup of milk

Add all the syrup ingredients to a medium saucepan and bring to a gentle boil.

While the syrup is heating, in a bowl rub the butter into the flour until it looks slightly crumbly.

Combine the milk and egg in a cup then add to the flour mixture.  Mix with a knife until just combined.

Turn the dough out onto a floured surface and knead slightly into a ball.

Portion 8 equal dumplings from the dough and gently place into the heated syrup.

Place the lid on the saucepan,  turn the heat down to a minimum and cook for 20 minutes.

DO NOT LIFT THE LID until the 20 minutes are up.

Serve with cream,  icecream,  milk or a combination of your choice.

Serves 4 - 8.

May be refrigerated for a couple of days and reheated in the microwave.


Wednesday, 4 July 2018

Chocolate Truffles

This recipe has been a family favourite since the 1980's.  I can't lay claim to the recipe but I've been known to make variations that include choc chips,  dried fruit and nuts.

I packet of milk arrowroot biscuits
1/2 cup of desiccated coconut
1 tins of sweetened condensed milk
2 tablespoons of cocoa powder - sifted
extra coconut for rolling

Crush the biscuits until they are a fine crumb.  You can do this in a food processor or with a rolling pin on baking paper.

Add the crushed biscuits,  coconut and cocoa powder to a large bowl and mix well.

Add the sweetened condensed milk to the biscuits and mix until well combined.

In a medium bowl add the extra desiccated  coconut   ( 2/3 of a cup approx. ).

Using a teaspoon,  form small balls of mixture and roll between your hands to smooth out the lumps.

Roll the balls in the extra coconut and place on a tray.

Refrigerate for one hour until firm

Store in the fridge for up to two weeks.

HANDY TIPS -

*  Make sure your hands are wet when forming the mixture into balls. This stops the mixture from sticking to your hands.

*  I use generic ( no name ) ingredients to reduce costs. If I have time,  I make the sweetened condensed milk from scratch..

*  Add finely chopped apricots,  choc bits and peanuts for a different flavour.


Wednesday, 20 June 2018

Easy Lo Mein

I first saw this dish doing the rounds on Facebook recently.  It comes from a blog ' The Recipe Critic  '.  My first thought was that it looked so easy to make.  My second thought was "  It needs more veggies and I'll make it my own. " Here my version of this tasty dish -


400 grams of spaghetti pasta
2 cups of broccoli florets
1 cup of cauliflower florets
1 large carrot thinly sliced ( Julienne )
300 - 400 grams of steak thinly sliced against the grain
1 tablespoon of olive oil

SAUCE

1/4 cup of brown sugar
1/4 cup of soy sauce ( salt reduced if preferred )
2 tablespoons of Hoi Sin sauce
2 teaspoons of sesame oil
1/4 teaspoon of dried ground ginger
1 teaspoon of dried garlic powder
1/4 teaspoon of crushed chilli flakes ( optional )

Cook the pasta in salted water as per instructions.

While the pasta is cooking,  add the vegetables to a steamer insert and place over the top of the pasta saucepan.  Cook until slightly firm.  Alternatively,  steam them in the microwave.

Place oil in a fry pan and cook the beef until  brown.

In a medium bowl,  combine all the sauce ingredients.

Once the pasta is cooked,  drain well and return to the saucepan.

Add the steamed vegetables,  beef and sauce to the pasta and combine well.

Serve in pre warmed pasta / noodle bowls.

Serves 4 - 5 people

NOTES -

*  Beef is quite expensive at the moment.  I used three sizzle steaks which cost $4.50 to serve 3 people ( I halved the recipe for Darren and I ).

*  Drain the pasta really well.  Adding the sauce gives the dish plenty of moisture.

*  If broccoli and cauliflower are not in season,  use beans and zucchini instead.

*  Make sure you have all the vegetables and sauce  prepped before you start cooking.  This dish is reasonably fast to make so make sure you have everything ready to go.

*  I pre warm pasta bowls with a little boiled water in the bottom.  Be careful to drain the water away before serving your dish.

*  If using fresh garlic,  crush it and add to the beef when cooking.


Wednesday, 30 May 2018

Chunky Chicken And Veggie Soup

This hearty soup is very thrifty,  tasty and filling.  What more could you ask for ?

1 1/2 litres of homemade chicken stock or  store bought
Shredded chicken from the carcass or 1 chicken breast
1/2 cup of soup mix - washed ( Mc Kenzies )
4 - 5 large potatoes,  peeled and finely cubed
4 medium carrots peeled and finely cubed
2 sticks of celery or 1 broccoli stalk finely diced
1 400g tin of corn kernels
Dried onion flakes or 1 finely diced onion
2 teaspoons of dried or fresh parsley
1/2 cup of small shell pasta
1 tablespoon of chicken stock powder ( if needed )

Place the stock and washed soup mix in a large saucepan and bring to the boil.

Add all the veggies, parsley,  onion and chicken to the stock.

Simmer for 1 hour after adding the veggies.  Add extra water if the soup becomes too thick.

Add the pasta halfway through the cooking process

Once cooked,  add the chicken stock powder if needed.

Serve with crusty bread or on it's own

Can be frozen

Serves 6 - 10 depending on how hungry you are.


Here's the link to slow cooker chicken stock 


Wednesday, 16 May 2018

This And That Pasta Dish

A couple of months ago I had a little bit of cooked chicken and a few slices of shaved ham in the fridge.  With the ' Use It Up ' challenge in full swing,  I wanted to make the most of those little scraps.  So I made  up this recipe and to be honest,  it was very tasty.

1 cooked chicken fillet,  shredded or pickings from a chicken frame
150 - 200g of shaved ham ( any will do )
1 tin of crushed or diced tomatoes
1/2 a diced onion or dried onion flakes
1 glove of garlic or dried garlic granules or powder
1 1/2 teaspoons of  dried oregano
1 1/2 teaspoons of dried basil
2 handfuls of fresh spinach
salt and pepper to taste
1 tablespoon of tomato paste

350 - 400 grams of spiral pasta
Grated cheese to serve

Cook the pasta as per instructions

Add the tomatoes to a medium saucepan. 

Add all seasonings,  meats and onion. 

Cook for a few minutes then add the tomato paste if it needs a little extra flavour and thickening.

Just before serving add the spinach and stir through

Drain the pasta then serve the meat sauce on top.

Add cheese if desired

Serves 4


Wednesday, 25 April 2018

Pancakes

This is a very simple recipe that makes fluffy pancakes.  The original recipe said to use plain flour.but I wasn't happy with the results.  Changing to self raising flour gave the pancakes the lift they needed

1 cup of self raising flour
1 cup of milk ( full cream or skim )
1 egg
knob of butter

Whisk the flour,  milk and egg in a medium bowl..
Heat a medium frypan to a medium / hot temperature..
Add the knob of butter and spread over the base with a spatula / lifter..
Pour approximately 1/2 a cup of batter to the centre of the frypan..
Move and tilt  the frypan around so that the batter spreads a little.
When bubbles form and burst in the batter, turn the pancake over and cook the other side
.
Serve with your choice of butter,  maple syrup,  jam,  icecream,  cream,  lemon,  sugar or a savoury topping.

Makes approximately 6 - 8 pancakes