Showing posts with label Bathroom. Show all posts

Wednesday, 1 March 2023

Don't Flush Your Money Down The Toilet.

 Have you ever noticed how many products are available in the supermarket to keep your toilet sparkling and smelling lovely ?  There is a spray for this,  a wipe for that.  Then there are all those fragrant toilet blocks that promise a shiny white toilet bowl.

Have you stopped to think if these products really do what they claim to do ?

As a cleaner I've used just about every  product under the sun at my clients homes.  Not one single one of them makes your toilet clean.  But they make you feel good using them don't they ?  The marketing department of these companies have done their job.  You've parted with your hard earned dollars and made them rich.

The next time you go to clean your toilet,  have a look under the toilet bowl rim.  Is it clean ?  Toilet brushes usually don't reach under the rim so you are likely to find a lot of grime under there.

If you want to save big dollars and still have a clean toilet,  all you need is a pair of rubber gloves,  a washable cloth ( Chux type works great ) and a spray of some sort.  Disinfectant,  diluted kitchen detergent or vinegar in a spray bottle will all clean your toilet well.

Click on the link below to find out how I clean toilets for the best and cheapest results.

Cleaning your toilet


Wednesday, 15 February 2023

10 Ways To Keep Your Bathroom Cleaner

 Who doesn't like a sparkling clean bathroom ?  I've been cleaning bathrooms of all shapes and sizes for over 23 years with my cleaning job.  I've learnt quite a few tricks and tips along the way that save time and energy.  Yes it can take some effort to get a bathroom clean but these 10 simple steps will help it stay that way.

*  Provide a small bin for used toilet rolls, empty tubes of toothpaste,  tissues and used toiletries.  Having a bin will help corral the rubbish into one location.  I've seen plenty of discarded toilet rolls in bathrooms over the years and the solution is so easy.  Just make sure you empty the bin on a regular basis to help encourage family members and visitors to use it.  If you don't like washing out bins,  use freezer bags or recycled bread bags as bin liners.

*  Remove the clutter from around your sink.  There's no need to display everything you own.  Who has time to wipe dust off a heap of beauty products ?  Having a clear bench and sink makes it super easy to give it a quick wipe over to prevent dust and grime build up. 

*  Dry toothpaste can be a little hard to remove and requires some elbow grease.  Wipe spills from the bench and sink as quickly as you can before it dries.

*  Use a microfibre mirror cloth to clean your mirror like a pro.  Using a damp bath towel will leave streaks and fluff all over the surface resulting in you working harder to remove the residue.

*  Wipe down the shower with a squeegee after each use.  This will help prevent soap scum build up  and mould.  Using shower gel instead of soap helps prevent soap scum too.

*  Use kitchen detergent on all surfaces ( except the mirror ) with a microfibre cloth to cut through grease,  dust and grime.  Using cleaning products and / or disposable wipes can leave a  film that dust loves to stick to.

*  Keep your toilet lid closed when flushing.  Toilet water can spray up to 1.5 metres away from the toilet when flushing,  perhaps even reaching your toothbrush.  Not only does it contain bacteria ( including faeces ) but it also leaves marks on surrounding walls,  floors and shower screen.  If you like to use Blu Loo,  it's splashes will stain your walls.  Take it from someone who cleans these messes on a regular basis.

*  Flush the toilet after each use.  Leaving your deposits to save a bit of water will increase grime build up in the bowl.  If it's a very low flush toilet,  use the full flush every time to make sure you are left with clean water in the bowl.

*  Hang your bath towel up and spread it out.  Leaving it in a heap on the floor with increase bacteria in the fibres as well as encouraging mould to grow in the grouting.

*  Keep the exhaust fan on or open the window for about 30 minutes after each shower  Steam from the hot water contains oils,  dead skin cells and dust.


Do you have an trick to keeping your bathroom cleaner ?


Wednesday, 30 September 2020

3 Oils Every Home Should Have

If you've read the title of this post you're probably thinking of oils every kitchen should have.  True,  oils are needed for cooking but I'm going to talk about other types of oils.  

While I'm not into aromatherapy as such,  I do think there ire is a need for some essential oils in our lives.  All three of these oils also come in a water soluble version which increases their uses around the home. Here are the three we use all the time and couldn't live without  

Eucalyptus oil uses -

*  Clearing blocked noses when you have a cold.  I little on a tissue and placed under your nose can help with breathing.

*  For relieving bad sinus headaches.  I occasionally suffer from sinus headaches and found eucalyptus oil can work better than medication.  This might not work for all but it sure is worth trying.

*  Removing sticky residue / stickers from surfaces.  A little oil on a piece of paper towel goes a long way.

*  A key ingredient when making Miracle Spray.  The eucalyptus oil cuts through grime and soap scum and it sure beats using commercial cleaning products.

*  It can be used as a natural antibacterial cleaner.  Use on door knobs,  remotes and other surfaces.

* Great for getting rid of smells.  

Tea Tree Oil uses -

*  Reducing the severity of cold sores.  Dab a little on the spot as soon as it starts to tingle.  Continue to do this 2 or 3 times a day for the first few days.  Then apply something like paw paw ointment until the cold sore clears.  This is a cheaper way to treat cold sores than buying the little tubes of ointment.

*  Treating minor cuts and abrasions.  We no longer buy Dettol and use tea tree oil instead.

*  Treating pimples and acne.

Lavender Oil  uses-

*  Make your own room spray by adding water soluble lavender oil and water to a spray bottle.

*  Spray on your pillow at bedtime for a calming,  soothing effect.

*  As a natural perfume.


How do you use these three oils ?


Wednesday, 18 July 2018

Getting The Most Out Of A Toothpaste Tube

Do you have squeezers and twisters of toothpaste tubes in your home ?  Do you find it frustrating when a tube is in the bin when others think there's no more to squeeze ( but you know otherwise ) ?

Here are a few simple ways to get more out of the tube

!.
Place the tube in both of your hands.  One hand at the top,  one at the bottom
Starting at the bottom end of the tube,  run it over the edge of a bench until you reach the top.
This should push all the toothpaste to the top of the tube.

2.
Once you can't get any more from the tube after completing the above,  cut the top of the tube off.
Dig your toothbrush in.  There might be another couple of portions left.

3.
Keep squeezing the toothpaste to the top of the tube every few days.  The squeezers and twisters in the family will see that there is more toothpaste to use.  If you leave it until the tube has been twisted to billyo,  they'll just throw it in the bin when you are not looking,
.


Thursday, 17 August 2017

Make Your Own Bath Bombs

Making your own bath bombs is quite easy.  Once you've had a go you'll be making all sort of bath bombs to give as presents.  Here's the recipe Jessica and I used recently -  

I cup of bi carb of soda ( baking soda )
1/2 cup of citric acid
1/2 cup of Epsom salts
1/2 cup of corn flour

1 teaspoon of water
2 teaspoons of essential oil
4 teaspoons of olive oil
3 - 4  drops of food coloring

Mix all the dry ingredients together in a bowl with a whisk

In a small glass bowl or jar mix all the wet ingredients together

Slowly add the wet ingredients to the dry ones mixing / whisking constantly as you go. Don't add too much of the wet ingredients or it will foam up.

Press the mixture into bath bomb moulds or silicon baking moulds.

Dry overnight or put into a warm oven for 45 minutes.  The oven temperature needs to be as low as you can get.

Gently unmould when cold and hard.


Thursday, 15 June 2017

Old Shower Caddy

It seems a shame to throw out shower caddies when they get a little rusty or grotty.  After giving them a scrub with an old tooth brush,  repurpose them around the home or shed.  Here are a few ideas -

*  Attach it to the laundry wall above the trough and store your Miracle Spray,  vinegar,
disinfectant,  nail brushes and sponges.

*  Hang it from a hook in the garden shed and use the caddy to store snail bait,  liquid fertiliser and small garden hand tools.

*  Hang it inside a wardrobe on the door or wall to store hairspray,  perfumes,  belts and scarves.


Thursday, 6 April 2017

Olive Oil Soap

I just love making my own soap.  It's been wonderful on my skin helping to clear up the allergic reaction I was having to shower gel.  Last year Phil from Mr Homemaker blog gave me a recipe for soap that contained olive oil and rice bran oil.  Because I'd been given quite a few bottles of olive oil,  I changed the recipe to omit the rice bran oil. 

I've found this soap to be of better quality than the other soap  I was making.  This olive oil soap seems to set harder and has a more luxurious feel and lather.  The color tends to be whiter,  only changing to a light cream color over time when stored.

Please keep in mind,  this soap comes to trace very quickly so make sure you have all your moulds ready to go before making.


1000 grams of olive oil,
250 grams of Copha (1 x block)
173 grams of Caustic Soda
450 mils of water.

1. Chop up Copha into small chunks and place into a large non-metallic bowl

2. Make your Lye .in a separate non metallic container by adding  Caustic Soda slowly to the water (never the other way around!)  a little at a time stirring continually.  Watch out for the fumes.

3. Slowly and carefully pour the  lye over Copha chunks

4. Stir Copha and Lye manually with a non metallic spoon / spatula till Copha chunks are all dissolved by the heat of the lye.

5. Slowly add the olive oil while stirring.

6. Use a stick blender to reach a good trace (do not over-heat your stick blender - alternate between stirring and power mode.)

7. Pour the mixture into your moulds and smooth off the top.

8. Place glad wrap over moulds

9. Wrap moulds in old toweling (so they cool slowly)

10. Un-mould in 24-48 hours

11. Cure for 6 weeks

NOTES -

*  Make sure you are wearing covered shoes,  rubber gloves,  protective eye wear and a face mask.. The fumes from the lye can be quite strong especially if you make the soap indoors.  Sometimes I make the lye solution outside,  pour in the other ingredients ,  then bring it all inside to mix together. After making it a few times,  I no longer wear a face mask or glasses but I'm extra careful.

*  Care should be taken when making the lye.  Slowly and gently is the key. One granule of Caustic Soda falling on unprotected skin will sting quite badly.

*  Trace is when the mixture looks like custard starting to thicken.  You'll see ripples in the mixture when blending.

*  This recipe can come to trace in as little as 5 minutes.  If you over, mix the ingredients you'll have trouble getting it into the mould.  The first time I made it,  I over mixed it and there were air bubbles in the soaps.

*  Make sure you have all your equipment out before starting.  This includes a spatula to scrape the bowl.

*  Have baking trays under the moulds before pouring.  This makes moving the moulds to a better location ( for curing ) easier and safer.

Made back in July 2016.  It's only just starting to change color.

Make sure it's for soap making

The mixture has come to trace

Pouring into the moulds


Great for presents too.

There the link to the other soap recipe I've used
http://myabundantlife07.blogspot.com.au/2015/10/soap-making.html

Monday, 9 May 2016

Cleaning The Toilet

Having a clean home is something most of us like to have. If you believe TV advertising, cleaning products can perform miracles. Showers are clean with one wipe and toilets are sparkling with one fragrant little disc. All is not what it seems to be.

Toilet cleaning products are so expensive and can easily increase your food budget by about $10 a month. It doesn't have to be that way. I've been a domestic cleaner for about 17 years and on average cleaned more than 10 toilets a week. I've used every toilet cleaning product on the market. This is what I've learnt over the years -

* Toilet cleaners do not keep mould from growing under the rim.
* Disinfectant wipes are too thin to do a good job. At approximately 8cents a cloth often you need to use two.
* Toilet brushes do NOT get into all the crevices.
* The stick on toilet discs get in the way of cleaning the bowl
* Toilet blocks without the cage disintegrate when you move them to clean the bowl.
* Cheap liquid toilet blocks do not last very long.
* Blu loo ends up splashed all over the walls.

Here's how I keep my toilets sparkling clean on a budget.  I use no name chux type cloths. If they are big I cut them in half.  I spray a couple of squirts of Miracle Spray or disinfectant into the toilet bowl and onto the cloth. I wipe the outside of the toilet first, folding over the cloth when it gets dirty so that I  get a clean surface. I then wipe the inside of the lid,  then the seat,  then the underneath of the seat then the top of the toilet bowl where the seat rests.   Using your rubber gloves and cloth, wipe over the toilet bowl digging down as far as you can go into the pipe. Then wedge the cloth up under the rim ( if your toilet has one ) to get out the grime.

Flush

I throw the cloths into a bucket with disinfectant to soak until my next wash day.   The cloths are put into a linen bag and thrown in the washing machine with the towels. These cloths are so durable they can last up to six months. All for about 10 cents per cloth. Combine that with the budget friendly Miracle Spray which costs about $1 per litre.   Cheap and easy as.

If you keep your toilets clean, then you'll find that toilet blocks and other products are not that necessary after all.


Monday, 2 May 2016

Put A Pump On It.

Putting a pump on cleaning products and toiletries can save you small fortune.  A few years ago I noticed a family member preparing to wash some dishes.  Out came the dishwashing liquid and SQUIRRRRRRRTTTT.  Yes you guessed it.  An enormous squirt of dishwashing liquid went into the sink.  Combine that with fast flowing water and the family member ended up with a sink full of bubbles and very little water.  Infact,  you couldn't see the water and the bubbles were a foot high.

I know I've been called tight or cheap but sometimes portion control just makes sense.  I don't like to see waste whether it be money,  consumables or possessions.  I would prefer to be a good steward of what I have.  Yes it might save a few dollars here and there.  It could help the environment too.  Portion control in my house really makes life easier.

Quite a few products now come with pumps on them.  You'll find them on large bottles for easy use.  What do you do with those pumps when the bottle is empty ?  If you are throwing them out because you don't have a need for them,  think again.

Here are some examples of how I reuse pumps to save us money -

*  Large bottles of shower gel come with a pump.  I'm unlikely to refill a large bottle simply because it's not cost effective to buy small bottles of shower gel for that purpose.  Sometimes those pumps will fit large bottles of shampoo and conditioner.  TRESemme shampoo and conditioner doesn't come with pumps and those large bottles are hard to manage in the shower.  Put a pump on it and you have portion control.  Dilute the shampoo and conditioner and you'll save even more money.

*  As I mentioned above,  dishwashing liquid is hard to portion control.  I saved pumps from liquid hand soap ( before foaming hand wash days ) and put them on the dishwashing liquid bottles.  I know two pumps of the liquid will wash my dishes.

*  Darren uses hair gel each day to tame his curly hair.  For years he used containers of hair gel and it was messy.  A couple of years ago we found hair gel in a pump bottle.  Now when the bottle is empty we refill it with other brands of hair gel.  No more trying to screw on a lid with sticky hands.

*  We've saved liquid hand soap bottles and refilled them with shower gel.  Portion controlling shower gel,  no matter how small the bottle is,  can be tricky in the shower.  We've even emptied all the little bottles from hotel accommodation into a pump bottle.


Each time you go to throw out a pump bottle,  think again.  Can you refill that bottle with something else ?  If not,  will that pump fit onto another bottle ?  It's well worth a try.


Monday, 5 October 2015

Soap Making

For a few years now I've been wanting to make soap but was too frightened.  I think I was frightened of the safety aspect and the unknown.

Soap making was one of my goals for this year so I thought it was time to take the plunge. I came across a very simple and cheap recipe from a blog I follow called House of Simple.  Phil is the blog writer and he promised it would be easy.  So one Saturday I followed the instructions ( to the letter ) and the soap turned out beautifully.

Here are the instructions from House of Simple ( used with permission )  


Blended Vegetable Oil Soap
Safety Note: Wear eye protection, mask and gloves, keep kids and pets away, perform in close proximity to running water in case of spills, keep a window open for ventilation.


INGREDIENTS


1.25 litres of cheap blended vegetable oil (no name is perfect)
173 grams of caustic soda
450 mils of water


METHOD(please follow method exactly in this order)


1. Place water into a very large plastic mixing bowl
2. Pour caustic soda very slowly into water whilst stirring continually with a wooden or plastic spoon until dissolved
3. Add in vegetable oil slowly, stirring all the while with a wooden or plastic spoon
4. Mix with stick blender till a firm trace has occurred - must look like thick custard.
5. Place into large plastic flat-bottomed container - cover with an old towel.
6. Leave totally undisturbed for 24 hours
7. Remove from plastic container (twist the container slightly - turn upside down to pop out).8. Cut into bars with the sharpest knife you have
9. Put bars away on a wire rack in a cool airy place to cure for 6 weeks
This recipe will make about 12 bars of simple, frugal and lovely-to-use soap. This recipe is a great one to start with if you have not made soap before as there is no oil blending required, no thermometers required, no special molds or perfumes required either. The ingredients are not expensive which is important for a first time soap maker and vegetable oil is very forgiving

Wendy's notes -


*  I used silicon baking moulds as well as small oblong cake tins.  Silicon baking moulds can be found really cheap at op shops.

*  If using metal cake tins,  line them with cling wrap first for easy removal of the soap when it sets.

*  If the soap hasn't set enough within 24 hours, leave it for another 24 hours then you should be able to remove it from the moulds.

*  If you have an Aldi near you,  they have the cheapest blended vegetable oil at under $8 for 4 litres.

*  I bought the Caustic Soda from Bunnings.  I think it was in the paint section.  Make sure the container has the words "  for soap making " on it.

*  Make sure you have all your moulds close by and ready to use straight after the mixture reaches trace.

*  These soaps will make wonderful presents when added to a fancy face washer or hand towel.

*  I did not put a coloring or fragrance in the soap as I have skin allergies.

Some of the soaps I made
Reaching trace.  It looks like thick custard
Rose moulds
Waiting for the soap  to set
This was from Bunnings

Monday, 7 September 2015

Bathroom Bin Liners.

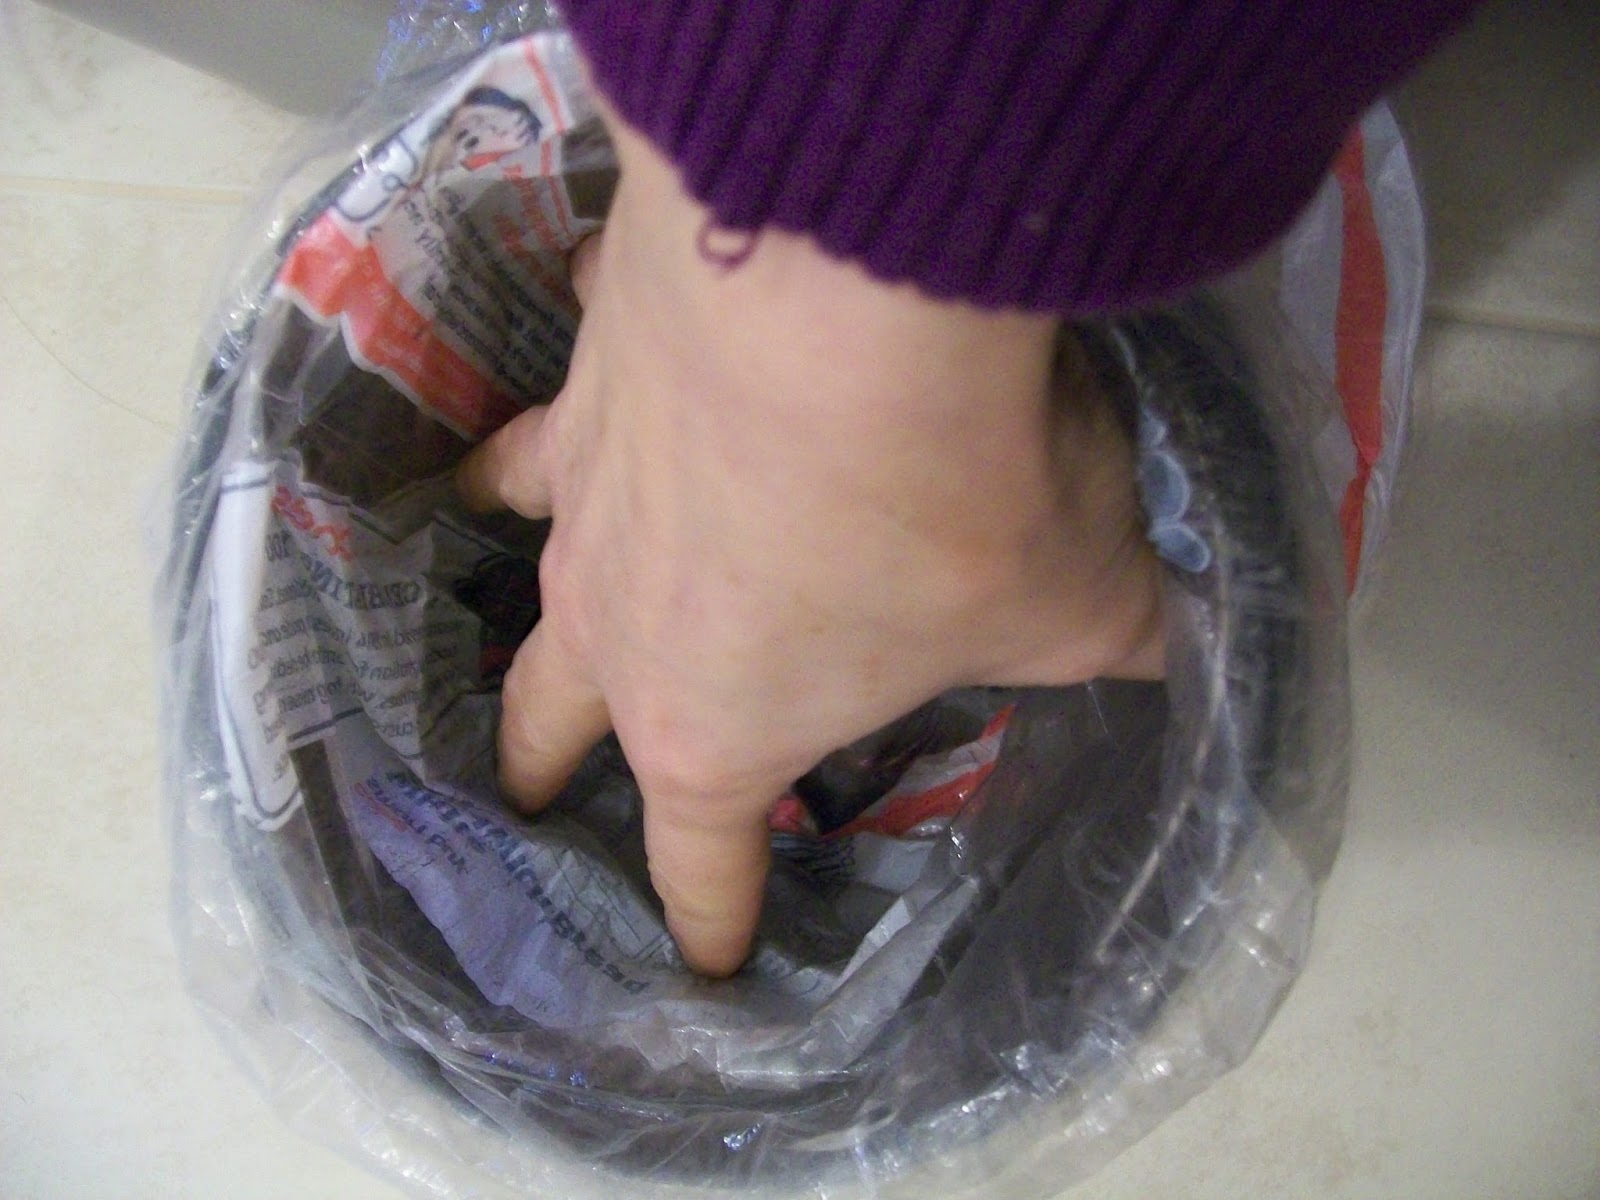
Bathroom bins can get quite smelly and dirty.  A great way to protect the inner bin bucket is to use old bread bags as bin liners.  I use five bread bags at a time on a bin I purchased from Kmart for $7


Remove the inner bin bucket.

Cut a slit in the bread bag about 1/3 of the way down from the top


Line the inner bucket with the bag.  Move your hand around the inside to squash the air out of the liner.


Continue lining the bin another four times.  This is a great time saver and means your not scrounging around for bin liners each week.


When replacing the inner bin bucket,  flatten all the liners and edges to one side and slide the bucket into the bin.


Tuesday, 3 February 2015

February's Theme - Being Water Wise

Now that the kids are back in school,  I thought it was time to set a monthly theme to help save time,  money and energy.  I'm very goal driven and find that I achieve so much more when I have goals written down

Each month I'll post a new theme and I hope you will join in as we strive for cheaper bills,  more home cooked food and a well organised life

February's theme is being water wise.  Australia is a very dry country and for many,  many years we experienced a crippling drought.  Severe water restrictions were put in place and we eventually got used to watching every drop of water we used.

A couple of years ago the water restrictions were lifted with only minor restrictions still in place. Yet how many of us still watch our water usage ?  Do we still see water as a precious resource ? Water charges are on the increase each year and I must admit,  I don't like opening my water bill.  My family can't afford a rain water tank at this point so we need to find other ways to reduce the amount of water we use.

Here are some ways that my family saves water -

*  Saving the shower warm up water in a wide mouthed bucket.  If the weather is warm we use this water on the plants outside.  If the weather is cool or wet,  we pour the water into the washing machine.

*  Saving the washing machine rinse water and pouring it back into the machine for the next load.  I do this all year round and for every load.  The final rinse water for the last load of the day is poured onto the garden around the house.  It can't be used on the vegetable garden as it contains bacteria but it's safe for other plants and the grass.

*  Putting a large ice cream container or bucket in one of the kitchen sinks to catch the water from hand washing,  drink bottles and rinsing vegetables.  This saved water is then used to rinse dishes before being put in the dishwasher.  I also use the water for rinsing out the other sink.  If there is any leftover water after these tasks are done,  I pour it into a watering can outside to be used in the garden.  If it's really clean water I water vegetable seedlings with it.

*  Using a wind up timer for shorter showers.  I've tried digital timers but eventually they rust or the battery dies.  Replacement batteries cost more than the water you'd be saving.  I've picked up wind up timers at the Reject Shop and other discount stores.

*  Have a large jug or bottle of water in the fridge.  In Summer tap water is warm so having a jug in the fridge will eliminate the need to run the water waiting for it to come out cool..

*  Watering vegetable and garden plants with a watering can.  Using a watering can is great for getting the water where it's needed -at the base of the plant.  If your garden is large then maybe this option is not for you.

*  Having a water saving shower head.  This might sound basic but many homes still haven't changed over.  Even if you have a water saving shower head,  only turn on the taps until a reasonable stream of water comes through.  Not every shower needs to be a power shower.

*  If you have plants in pots,  put them in the shade on hot days.  You won't have to use as much water to keep them alive.

*  Water your garden early in the morning or after tea during Summer.  This gives the plants a chance to absorb the water before it evaporates.

*  Put a bucket under a out pipe on your hot water system.  Water drips out constantly so why not save it for a plant.

*  Use the shower to shower,  not brush your teeth or shave your face ( for the men ).  Even with a water saving shower head,  brushing your teeth uses about nine litres.  Shaving and brushing your teeth at the sink uses less than one litre.

*  Have the tap turned off when brushing your teeth.  Maybe use a cup of water to rinse your mouth.

*  Using the dishwasher when it's really full.


Please feel free to update us with your progress throughout the month.  We'd all love to hear how others are saving water..

What water saving goals do you have for the month of February ?

How do you save water around the home ?

My watering can.

Our new bathroom taps

An ice cream container in the kitchen sink .

Tuesday, 25 November 2014

Fancy Face Washers

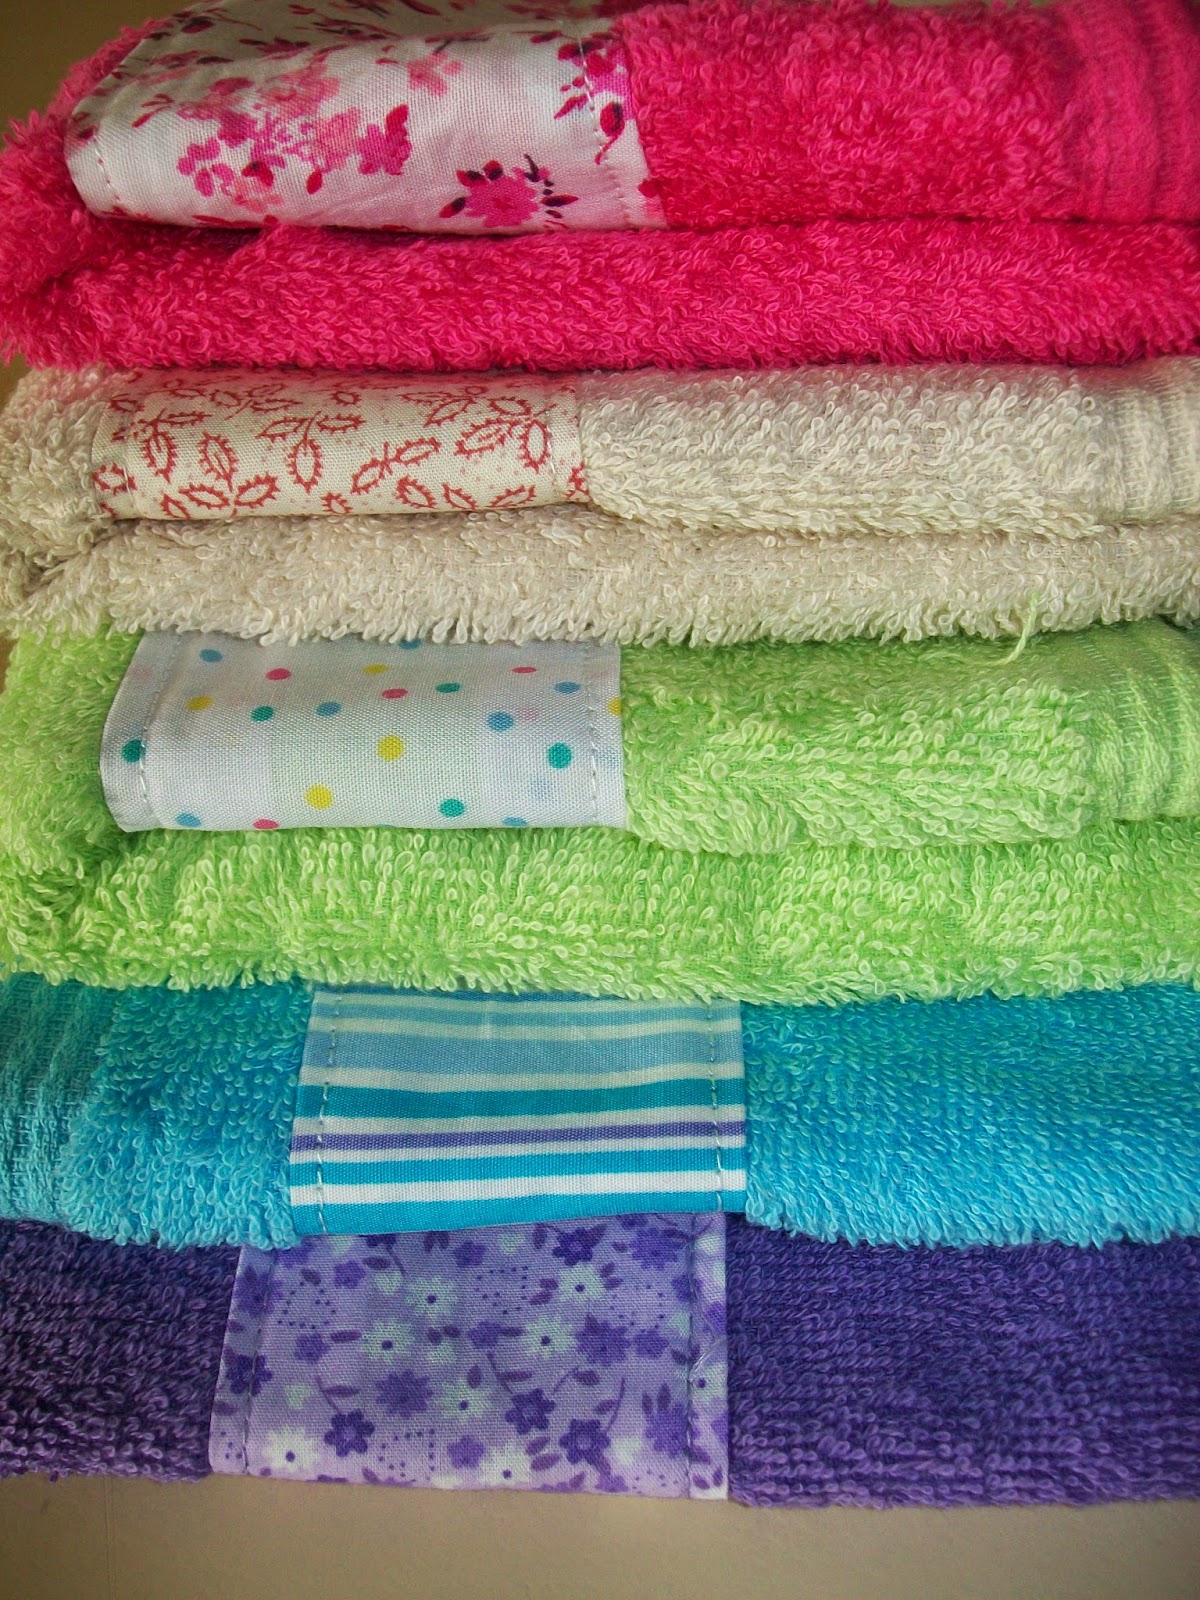
Fancy face washers make lovely presents for females of any age.  My Grandma gave me face washers and hand towels with crocheted edges for birthday presents when I was little.  They were beautiful and I loved them.  It was twenty years before I was able to unpack them for use in my own home.  Every time I used them I thought of my Grandma.

I can't crochet ( yet ) so here's my version of a fancy face washer.  All you need is-

*  Scraps of material about 10 cm wide x the length of the face washer or hand towel.

*  New face washers or hand towels.

*  Sewing machine or neeedle and thread

*  Iron

Cut the material strip to the desired width and length allowing an extra centimetre for a seam around all the edges.

Fold and iron the one centimetre allowance back onto the wrong side of the material.

Sew the material onto the right side of the face washer.  Quite often face washers have a strip of detail woven across.  I cover this with the material.

Trim all cottons and there you have it,  a lovely present that cost $1 - $2.  My girls have requested one in their Christmas stocking.